Backup
TLDR;
all servers perform a file-system based snapshot once a day
a snapshot is a snapshot of the whole filesystem’s state at the time of creation
the snapshots are mirrored to an off-site location once a day
retention is 30 days
Please find a slightly more detailed description of our backup setup below:
About our Backup Setup
The filesystem snapshots are created and stored locally on the disk of the managed server (shown yellow in the upper part of the diagram).
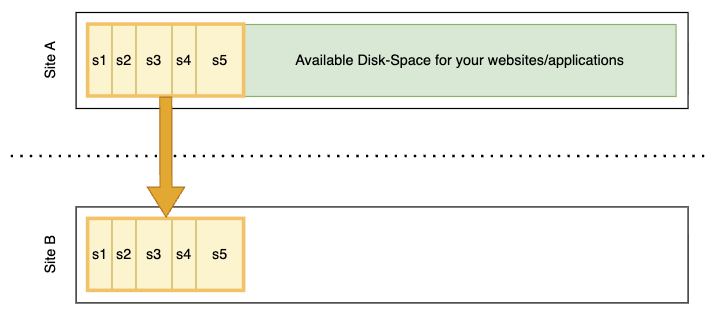
Diagram that shows the local snapshots on a managed server (upper part), and that those get mirrored to an off-site backup storage at a different location.
The snapshots are then mirrored to our off-site backup storage environment. This is located in a geographically separated area in a different datacenter.
We consider the two locations of snapshots to be for different scenarios:
local snapshots: for quick recovery, e.g. to restore an accidentally deleted file by yourself (self-service), see how to to in following sections
off-site snapshots: for disaster recovery in case of e.g. hardware failure at the primary site, recovery from the off-site backup storage is a task for the Ops One team if required (no self-service)
Note
All backup processes are fully automated and also continuously monitored to ensure smooth operations. The different restore procedures are periodically tested and trained among the Ops One team.
Disk space consumation
Disk-space of the overall disk is occupied by both your project’s files (including databases, shown green below) and the snapshots (shown yellow below).

Example of a disk that contains some Snapshots, with the remaining disk space available for your projects.
In the above diagram you can see that the snapshots consume some space, but only a small fraction. A snapshot consumes only as much space on the disk, as the “difference” (e.g. all changed files) since the last snapshot.

Example of the same disk, but now with one larger snapshot, showing that the remaining disk space is reduced.
In case you have many changes, the next snapshot (e.g. the “s5” snapshot in the above diagram) will consume more disk space. Also if you perform more snapshots (automated but more often, or manually created), chances are that those snapshots will consume a bit more space of your overall disk.
Note
Please understand that the disk space for snapshot in the above diagrams is shown disproportional for the sake of clarity and readability. Usually the sum of all snapshot’s space is way lower compared to files used for the websites and applications on the server!
A simplified example
To further illustrate this, let’s look at the following example:
If you have a server and add a 100 MB file, the next snapshot will contain those 100 MB.
Without overwriting this 100 MB file, the server usually writes a few files, like log files. The next snapshot will thus just contain the difference of those changed log files.
Once you overwrite your 100 MB file, the next snapshot will consume an additional 100 MB for the changed file.
The example above is simplified. But as a rule of thumb you can expect each snapshot to consume the sum of the size of all changed files.
Backup Interval and Retention
By default, our managed servers create one daily snapshot that is kept for 30 days. These snapshots are taken at night (in the early hours of each day). The exact time differs slightly from server to server.
You can create additional snapshots manually (see next section).
Tip
Please contact us in case you have other requirements like shorter interval for creating snapshots or longer retention time. As of now, you can not change this configuration via the cockpit by yourself.
Day to day usage
Create Snapshot
If you’re about to do something dangerous, consider creating a snapshot before your changes, so you have a restore-point set and could go back to this if needed.
snapshot-create
You can snapshot the filesystem up to once every minute.
Those manually crated snapshots are kept for the same duration as the automated nightly-snapshots.
Delete Snapshot
as devop user (see Generic Admin User) you can delete snapshots manually with
snapshot-delete, see--helpfor detailsfor safety reasons only snapshots older than 48 hours can be deleted
Warning
Deleting snapshots is a destructive action. Please make sure you really want to delete the snapshot before executing the command. Deleted snapshots cannot be restored, not even via support.
Restore from Backup
all available snapshots are mounted read-only in
/snapshots/for easy access, we symlink the home of each user for each snapshot within the users
~/backup/directoryyou can access them directly according your system permissions
See the needed steps and commands in the following sections showing you how to solve common data restore procedures yourself:
List all backup versions (snapshots)
Log in as the website user via SSH. Then run the following command to see a list of all snapshots:
find ~/backup/ -maxdepth 1

# alternative
ls -lah ~/backup/
# user@opsserver.ch in ~ disk:82% [17:14:23]
$ find ~/backup/ -maxdepth 1
/home/identity/backup/
/home/identity/backup/README
/home/identity/backup/20251224-0339
/home/identity/backup/20251225-0339
/home/identity/backup/20251226-0339
(...)
/home/identity/backup/20260122-0339
/home/identity/backup/20260122-1705
Each snapshot directory represents a backup version from which you can restore data.
The name of the snapshot’s directory (e.g. 20260115-0339) shows the timestamp when the snapshot was created.
If for example you deleted data on Tuesday at 11am and assuming you did not create any extra snapshots, you’d need to get the files from the last snapshot prior to your changes, which is the nightly snapshot of Tuesday at around 2 to 3 o’clock in the morning.
Note
Please keep in mind that files that are created after the last snapshot was taken, cannot be restored as they are never saved in a snapshot.
Compare a single file against Backup
Sometimes it’s easier to just compare the older version of a file to the current version than copying the file from backup first. Thanks to the local snapshots you can do this quickly and directly compare files against backup versions:
First of all, clarify what backup versions you have (see above) and choose against which snapshot you want to compare your current file.
In the example below, the file ~/backup-test.txt was created, a snapshot taken and then the file was overwritten.
diff -u ~/backup/20260122-1705/backup-test.txt backup-test.txt
The result is the difference view of those two file versions compared:
# user@opsserver.ch in ~ disk:82% [17:06:12]
$ diff -u ~/backup/20260122-1705/backup-test.txt backup-test.txt
--- /home/identity/backup/20260122-1705/backup-test.txt       2026-01-22 17:05:13.472627856 +0100
+++ backup-test.txt   2026-01-22 17:05:46.428843840 +0100
@@ -1 +1 @@
-This is the old text from backup!
+This is the overwritten version of this file...
Restore a single file from Backup
You can restore single files from the local snapshots yourself.
First of all, clarify what backup versions you have (see above) and choose from which snapshot you want to restore your file.
Then replace in the following command:
TIMESTAMP: the snapshot’s timestampFILEPATH: the path to your file (e.g.filename.txtfor files directly in the home directory, ordirectory/subdirectory/filename.txtfor files in sub-directories) in the following command
rsync ~/backup/TIMESTAMP/FILEPATH ~/FILEPATH
Following the example from above, we can now restore the file from backup and verify that it now shows the old content again that was present when the snapshot was taken:
# user@opsserver.ch in ~ disk:82% [17:24:39]
$ rsync ~/backup/20260122-1705/backup-test.txt ~/backup-test.txt

# user@opsserver.ch in ~ disk:82% [17:25:04]
$ cat ~/backup-test.txt
This is the old text from backup!
Restore a whole directory from Backup
In case you’d need to restore a whole directory and it’s contents instead of just a single file, the procedure is similar:
First of all, clarify what backup versions you have (see above) and choose from which snapshot you want to restore your directory.
Then replace in the following command:
TIMESTAMP: the snapshot’s timestampPATH: the path to the directory you need to restore (e.g.directoryfor a directory directly in the home directory, ordirectory/subdirectoryfor directories in sub-directories)
rsync ~/backup/TIMESTAMP/PATH ~/PATH
In the following example, a directory ~/backup-test with some files and a subdirectory in it was created, a snapshot taken - and then the directory was deleted again.
# user@opsserver.ch in ~ disk:82% [17:36:17]
$ ls backup-test/
ls: cannot access 'backup-test/': No such file or directory

# user@opsserver.ch in ~ disk:82% [17:36:19] C:2
$ rsync -r ~/backup/20260122-1734/backup-test ~/

# user@opsserver.ch in ~ disk:82% [17:36:24]
$ ls backup-test/
file1.txt  file2.txt  subdirectory1
The example below shows that the directory is missing, then got restored from the snapshot and is now present again, including it’s contents.
Restore a database from Backup
The required steps to restore data from a MariaDB database with our mysqlrestore tool is described in the database chapter, see Database Restore.
Restore a whole website from Backup
You cannot restore a whole website that got deleted via our Cockpit. Please contact us to perform the restore in such a case.
Note
The reason for this limitation stems from the different UIDs of the linux users of the deleted and a new website - even if they share the exact same website-name / user-name.