SSH Keys
Windows
Download and install the Putty Installer from the official download page (chiark.greenend.org.uk).
Create an SSH key pair
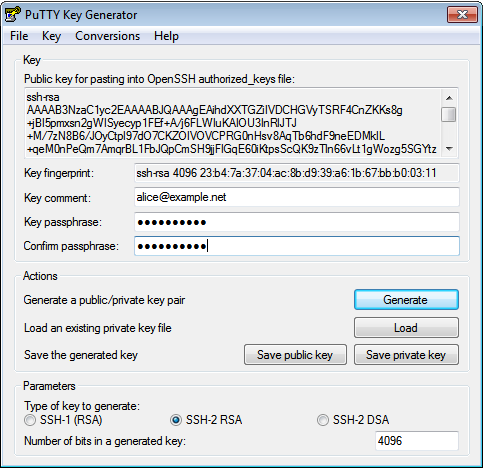
Start puttygen, select ED25519 and press the Generate button.
Alternatively you can select SSH-2 RSA and increase the
Number of bits in a generated key field to 4096:

Follow the instructions and generate randomness by moving the mouse on the requested area.
When the key is generated, change the Key comment to your e-mail
address and enter a secure Key passphrase. Press the
Save public key and Save private key button and copy the text in
the upmost field:
SSH Agent (Pageant)
Putty comes with a SSH agent named pageant. It comes bundled with the putty installer or you can find it on the putty download page. After you started Pageant, it will hide itselve in the systray. To add your key, open the Pageant dialog by right clicking on the systray icon. Please refere to the Pageant documentation for more information.
Agent Forwarding
WARNING: “Agent forwarding should be enabled with caution. Users with the ability to bypass file permissions on the remote host (for the agent’s UNIX-domain socket) can access the local agent through the forwarded connection. An attacker cannot obtain key material from the agent, however they can perform operations on the keys that enable them to authenticate using the identities loaded into the agent.” (openssh manual)
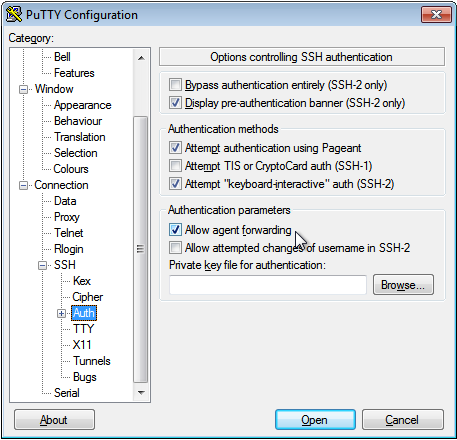
For several actions like checking out a git repository or copying a site
form stage to prod you need to forward your SSH Agent. First you have to
browse to Connection->SSH->Auth on the left-hand side, then you have
to enable the Allow agent forwarding checkbox:
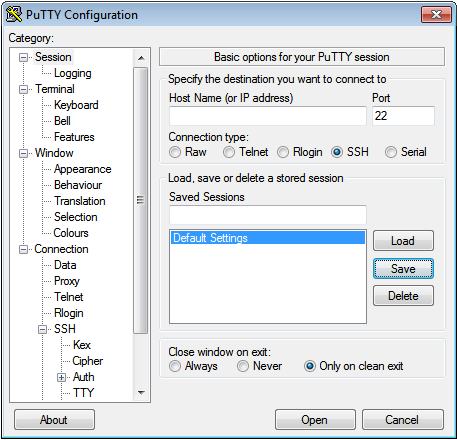
Afterwards you go back to Session and Save the Default Settings:
Mac, Linux
Create an SSH key pair
Make sure the openssh-client package is installed and issue this command in your favorite shell:
$ ssh-keygen -t ed25519 -a 100 -C '<e-mail@address>'
Warning
do not create keys without passphrase. If you do so, everyone with access to the key file will gain access to the server immediatelly
Agent Forwarding
For several actions like checking out a git repository or copying a site
form stage to prod you need to forward your SSH Agent. Use the command
ssh -F or the SSH config directive ForwardAgent yes to forward
your SSH Agent.
SSH agent
Since you encrypted your key with a secure passphrase, you have to enter this passphrase every time you attempt to connect to an SSH Server in order to decrypt your private key.
An SSH agent caches your decrypted keys and provides them to SSH client programs. Thus the passphrase must only provided once, when adding your private key to the agent’s cache.
Hint: Usually you would start your agent upon login, and let it run until you logout. There are many diffrent agents, and they are typically well integrated to your OS, SHELL or Desktop Environment. Please refer to the documentation of your favorite agent.
This command starts ssh-agent, the SSH agent of openssh, and exports the SSH_AUTH_SOCK and SSH_AGENT_PID variables:
$ eval $(ssh-agent)
Then you need to add your private key to the ssh-agent cache:
$ ssh-add -c <keyfile>
You can now connect to any SSH server without typing your passphrase.
You can check for a running SSH agent with the command
echo $SSH_AUTH_SOCK.
Warning: Please use the -c flag to prevent key hijacking. This flag ‘’indicates that added identities should be subject to confirmation before being used for authentication’’. That means, you have to confirm all uses of your key, espessially when you are logged in to a server (with enabled AgentForwarding) and another user tries to steal your identity. Please refere to the documentation of your favorite agent on how to prevent key hijacking.
Confirmation is performed by the SSH_ASKPASS program mentioned below. Successful confirmation is signaled by a zero exit status from the SSH_ASKPASS program, rather than text entered into the requester.
Update passphrase without generating a new key
$ ssh-keygen -f <keyfile> -p